WordPress AI Client and Connectors: A Simple Setup Guide
See how WordPress AI Client and Connectors work, connect an AI provider, use AI inside the editor, and follow essential safety checks.
WordPress 7.0 introduced a shared foundation for AI features. The AI Client lets plugins request AI help, while Connectors manage access to providers such as Google, OpenAI, or Anthropic.
This does not make WordPress autonomous. You still need a compatible plugin, a provider connection, and human review before anything goes live.
At a glance

The important distinction is simple:
- The AI Client carries the request.
- A Connector manages the provider connection.
- The provider generates the result.
- You decide whether that result is good enough to use.
How WordPress AI works
A plugin can ask WordPress for text, an image, a summary, or another supported result. WordPress checks the connected provider, sends the request, and returns the response to the plugin.
That shared flow can reduce duplicate API-key screens and make it easier to change providers later. WordPress Core provides the foundation, but it does not bundle every AI provider directly.

In practice, the workflow is:
- Choose an AI provider.
- Add its API key through a Connector.
- Confirm that the provider is connected.
- Install and open the AI plugin.
- Enable only the features you need.
- Use AI in the editor and review every result.
Connect an AI provider in WordPress
The following screenshots come from a real WordPress Playground site named Waqas Dev AI. The interface is experimental, so some labels may change.
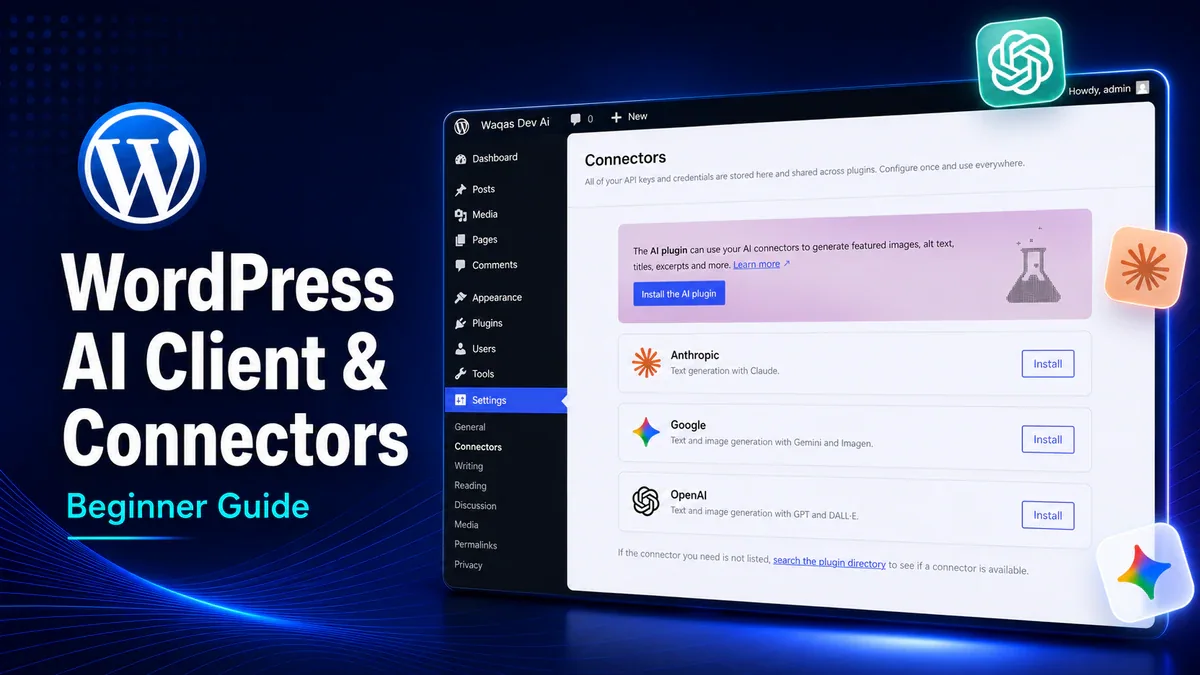
Step 1: choose a provider
Open Settings > Connectors and install the provider you want to use. This example uses Google and Gemini.

Step 2: add the API key
Paste the provider API key and click Save. Treat the key like a password: never expose it in screenshots, support tickets, or public repositories.

Step 3: confirm the connection
Check for the green Connected status. If it fails, confirm that the key is active and allowed to use the selected provider API.

Step 4: install and open the AI plugin
The Connector provides access to the AI service, but the AI plugin adds the editor features. Install it from the Connectors screen, then open its settings.

Step 5: enable useful features
Open Settings > AI and enable only what you plan to use. Start with low-risk tools such as summaries, titles, excerpts, or alt-text suggestions.

Step 6: use AI in the editor
Open a post or page. Available actions may include generating a summary, suggesting editorial notes, creating an image, or improving metadata.

Useful AI tools inside the editor
The exact tools depend on the plugin and provider. These official WordPress AI plugin examples show three practical uses.
Title suggestions: Generate several options, then select or rewrite the strongest one.

Summary blocks: Turn a long article into a short, editable summary.

Image alt text: Generate a starting description, then check that it accurately explains the image’s purpose for screen-reader users.

AI output is a draft, not a decision. Check facts, tone, accessibility, image quality, and formatting before publishing.
Five safety rules
- Test on staging first. Do not experiment with unfamiliar AI tools on a live business site.
- Protect API keys. Limit Connector settings to trusted administrators.
- Start with draft-only tasks. Summaries, titles, and alt text carry less risk than automatic publishing or store changes.
- Review costs and privacy. Avoid sending customer data, orders, private messages, or confidential business information.
- Keep human approval. AI can suggest; a person should approve important changes.
Abilities and MCP can give AI tools defined actions inside WordPress. That is useful only when those actions have clear permissions and limits. For a practical store example, see my guide to managing WooCommerce with AI.
Should you use it now?
You do not need to configure the AI Client directly. Look for trusted plugins that support WordPress-native AI, explain where credentials are stored, and let you review every result.
For most sites, the best starting point is simple assistance: summaries, title ideas, alt text, and first drafts. Avoid automatic publishing or sensitive store actions until you understand the plugin, provider, permissions, and cost.
Final verdict
The WordPress AI Client and Connectors are useful because they can make AI integrations more consistent and easier to control.
Start small, connect only what you need, and keep a human in charge.